Button Images
This is about how to create the images you use in Rainmeter with a Button meter:
[MeterSample] |
Buttons are a special kind of meter in Rainmeter, and require a special kind of image. Rainmeter, like Windows, wants a button to have three "states". "UP", "DOWN" and "OVER", or "When your mouse isn't on the button", "When you are clicking on the button" and "When you are hovering over the button". This is referred to as a "bitmap" image.
Alternative 1 - Create the bitmap in your image editing software
Create the image in Photoshop, Gimp, Paint.NET, whatever you like. It's VERY helpful if the tool has the capability to create "layers" however.
Create a new image with a transparent background which has the "HEIGHT" of the image you want for the button, and a "WIDTH" which is three times the width of the image. This is because Rainmeter will want to find three horizontal versions of the image in the file; one for "UP", one for "DOWN" and one for "OVER" - in that order.
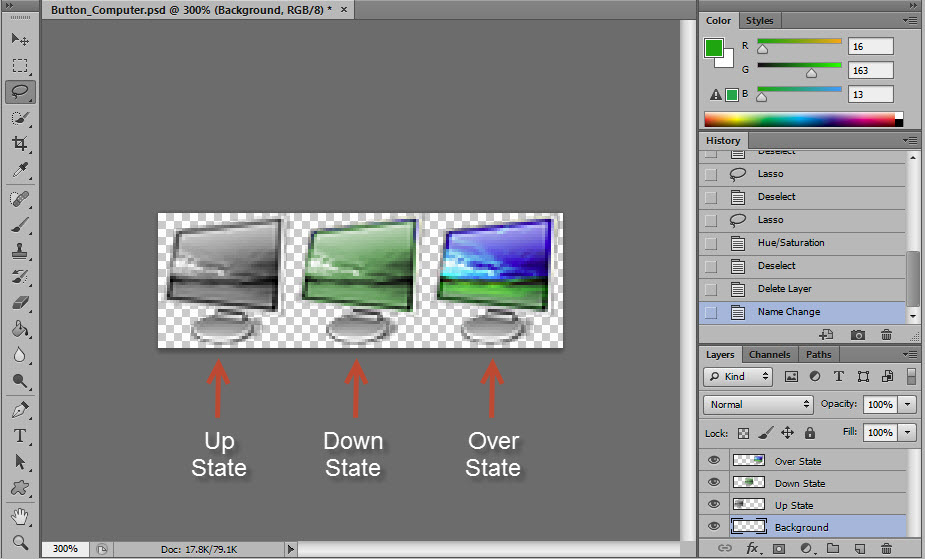
Each of the layers can have a different visual appearance (and positioning if you want the button to "move" when clicked) so that when you use the button it is clear what state the button is in.
Save the image as a .png (for a transparent background) or .jpg (solid background)

When you use the button in your code, Rainmeter chooses the 1/3 of the overall image to display depending on the state of the button.

Alternative 2 - Create the image with three separate image files, and ImageMagick
It can be challenging to properly create the bitmap image in a tool like Photoshop or Gimp if you are not used to using them. The important thing is that the separate images be positioned in the overall image file in a way that when the image is divided into three equal pieces by Rainmeter, the different "state" images are positioned correctly so the image doesn't appear to "move" when you hover over it or click it. It can take some trial-and-error to get this right using layers in a tool like Photoshop.
There is another approach that can take some of the guess-work out of this. What we want to do in this case is have three separate images, one for the "UP" state, one for the "DOWN" state, and one for the "OVER" state.
The only requirement is that the three images be exactly the same size in width and height.
So you might have three separate image files you downloaded from somewhere, or you might create a single image in your image editing software, and then save that file three times, after making whatever "transition effect" changes you want to reflect the "states". In either case, you want one image to indicate "UP", one for "DOWN" and one for "OVER".
Let's assume we end up with ComputerUp.png, ComputerDown.png and ComputerOver.png

Get ImageMagick
This is a free utility you can GET HERE
Download and install ImageMagick.
It will by default install to C:\Program Files\ImageMagick, and add itself to the Windows PATH.
Start a Command Prompt window.
In the Command Prompt window, combine your three files to a single bitmap.
Use the ImageMagick tool to combine the three images into the single bitmap image file. Any output image format can be used, but if your three files have transparency, you will need to output to .png.
The following is the format for the command line you will need:
convert +append "C:\PathToInput\UpFile.png" "C:\PathToInput\DownFile.png" "C:\PathToInput\OverFile.png" "C:\PathToOutput\OutputName.png"
Or in this example, while in the folder with the files:
convert +append "ComputerUp.png" "ComputerDown.png" "ComputerOver.png" "ComputerButton.png"
Be sure you combine them in the order "UP", "DOWN", "OVER".
This will create a single ComputerButton.png file exactly like our earlier example:

Again, when you use the button in your code, Rainmeter chooses the 1/3 of the overall image to display depending on the state of the button.