WebParser Tutorial
This tutorial is meant to shed some light on using the WebParser measure in Rainmeter to retrieve information from a website for use in your skins. A lot of us have used WebParser to get RSS feeds or other data from websites, but often by using or tweaking existing code, and without really understanding how it works.
WebParser overview
WebParser is a measure that is used to connect to some resource, normally a web site on the internet, read the raw HTML output that the site returns, and parse information from that output to use in meters in your skin.
When we say parse in this context, what we mean is to search the output for some text strings. Finding those strings will position you in the output at a point where you want some information. Then you capture that information, and display the results in meters.
The basic format of a WebParser skin is:
[MeasureParent] |
It is important right off to understand that WebParser works with a "parent / child" approach. What happens is that the parent measure connects to the site with the URL, and uses the RegExp option to capture some information with one or more instances of (.*). The captured information is held by WebParser, and is individually referenced by child measures with the StringIndex numbers. Each (.*) captures some information and creates a StringIndex.
The RegExp option
Now let's spend a minute talking about the key part of the code, that RegExp option. As we saw above, WebParser uses a regular expression to search for the bits of information you want to retrieve, and return them in one or more StringIndex values on the measure.
So how do we build one of these mysterious RegExp statements in Rainmeter? Let me use a template showing the format in simple terms:
RegExp=(?siU)Search1(.*)Search2.*
So enclosed in quotes, you have:
- (?siU) - Which is an "options modifier" for the regular expression, telling it how you want it to behave.
- Search1 - Which will be some text you will search on to get you right up to the data you want.
- (.*) - The data you want returned in the array to use in your skin. The parentheses tell it to "capture" everything between "Search1" and "Search2". In our examples we are using the string ".*" in our captures, which simply means "." (any character) and "*" (zero or more of them).
- Search2 - Use this to tell RegExp what to look for to know it's time to "stop" capturing information.
- .* - This will contain data from the website which is between this set of search/return parameters and the next one. It will not be returned as you did not enclose the .* in parentheses, and will not use a StringIndex number. This is used to "skip" to the next search you want to do.
What is this (?siU) stuff?
The (?siU) starts with the ? character to tell the regular expression that what follows inside the parentheses are directives for the overall expression.
the "s" tells RegExp to ignore line breaks and tabs when doing a search. For example, if you search for "Every good boy deserves favor" and it is split on two lines in the output, it will still match.
The "i" tells the search to be "case insensitive". Matches will work on both upper and lower case.
The "U" tells RegExp to be "ungreedy", meaning that it will return only the first instance of the match on the search string.
These directives are not required, but you will find that they are generally the right way to go when using WebParser in Rainmeter, and you will want to use "(?siU)" to start your RegExp most of the time.
A quick example:
You have a web page you want to get the "title" tag from. Here is the RegExp you would use:
RegExp=(?siU)<title>(.*)</title>
So we have told RegExp to search for the text "<title>" then capture (.*) everything after it in StringIndex 1 of the measure until it sees "</title>", where it will stop capturing.
This guide is meant to be simple and very "WebParser" focused. It is NOT a full-blown guide to regular expressions. I would encourage you to either now or later open up a browser tab/window here: Regular expression options and check out the various references and guides available.
Our tutorial skin
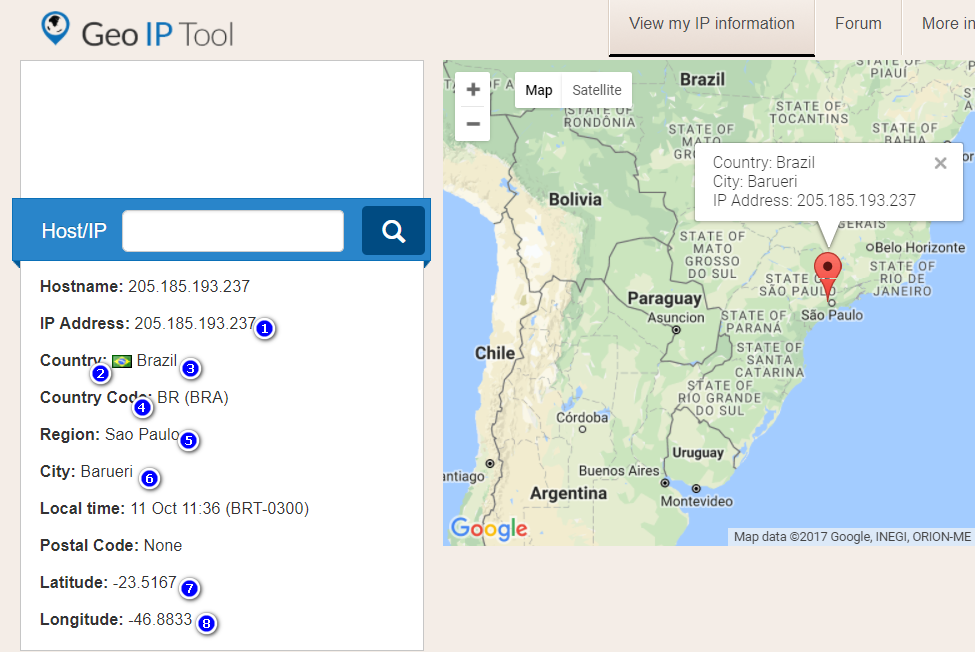
So what we are going to do today is parse a website https://www.geoiptool.com/ to get our IP and location information to use in a skin. Click that link now if you want to open the page in a new tab/window.
Here is what the web page we are going to parse looks like, with the information we are going to extract numbered:
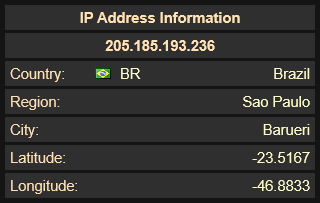
Here is the final skin we will create:
Let's Build It
First, let's get our skin started, and use an option on our first parent WebParser measure to get the raw HTML output from the site into a text file we can use for reference.
[Rainmeter] |
As you can see, we don't even have a RegExp option filled in yet, and only one dummy meter. We just want to use that Debug=2 option on the measure, then save and load the skin.
When Debug=2 is used, WebParser will connect to the site, and download the HTML that is returned into a text file. That file will be called WebParserDump.txt and will be in the same folder with the skin .ini file. Open that file in a text editor, so you have it to work with as we create our measures.
Once you have a copy of the site output in WebParserDump.txt, you should remove that Debug=2 option and save your skin.
Now let's look at the first bit of information we want to retrieve.
We want to start by getting our IP address. On the web page, it is near the top of the area with all the information we want, with a label "IP Address:".
Open up WebParserDump.txt (the saved output from the website) and search for that label. You will find a section of the html which looks like this. It should start at around line 458:
<div class="data-item"> |
The parent measure
First, we change that "parent" measure, we created above, containing the RegExp with the StringIndex captures.
[MeasureSite] |
The important options are:
URL=https://www.geoiptool.com/ - The URL to the website. It can be set as a variable in the [Variables] section to make it easier to find and change if you want.
RegExp=(?siU)<span class="bold">IP Address:</span>.*<span>(.*)</span> - Ah, the meat and potatoes...
You are telling RegExp to:
Use the (?siU) expression directives, (described earlier) search for <span class="bold">IP Address:</span>.*<span> and capture everything to a StringIndex (.*) until it sees </span>, where it will stop.
So if we look again at our output in WebParserDump.txt
<div class="data-item"> |
You can see that we will return 205.185.193.236 in StringIndex 1
UpdateRate=3600 - We want to check the website at a rate 3600 times the value in the "Update=" parameter in the "Rainmeter" section. As this defaults to "1000" or once every 1000 milliseconds (1 second) we will be running WebParser every 3600 seconds or 60 minutes. This is plenty often, as your IP information doesn't change much and you don't want to "spam" the website with requests. You may well find yourself blocked...
The first child measure
Then, we build a "child" measure, to grab that information from StringIndex 1 of the "parent" measure.
[MeasureIP] |
We are using the values returned by our parent measure [MeasureSite] as the URL for this measure, and setting the value contained in StringIndex=1. So the value of this child measure will be 205.185.193.236.
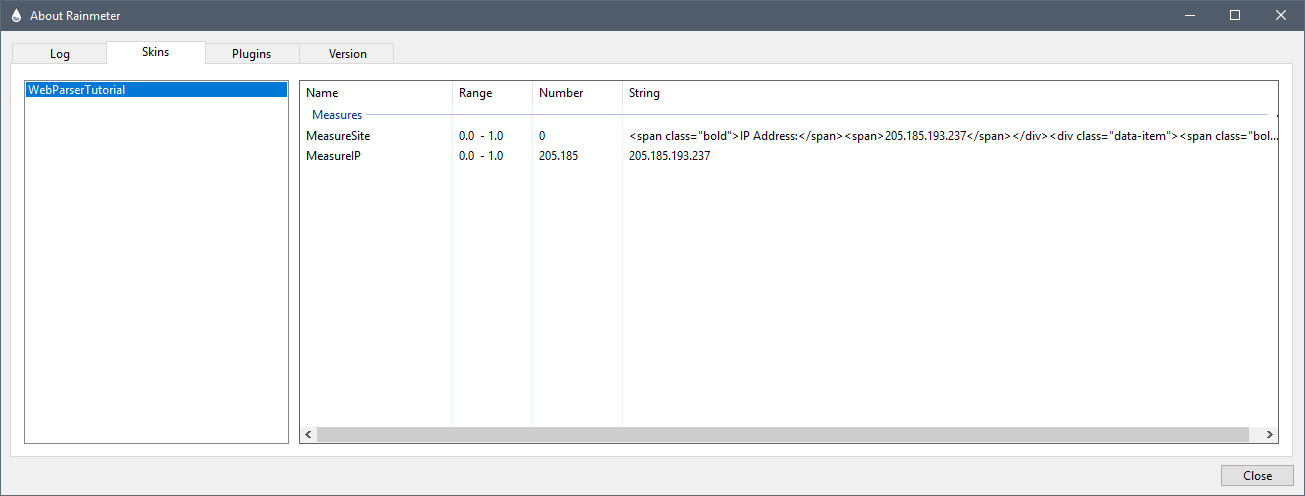
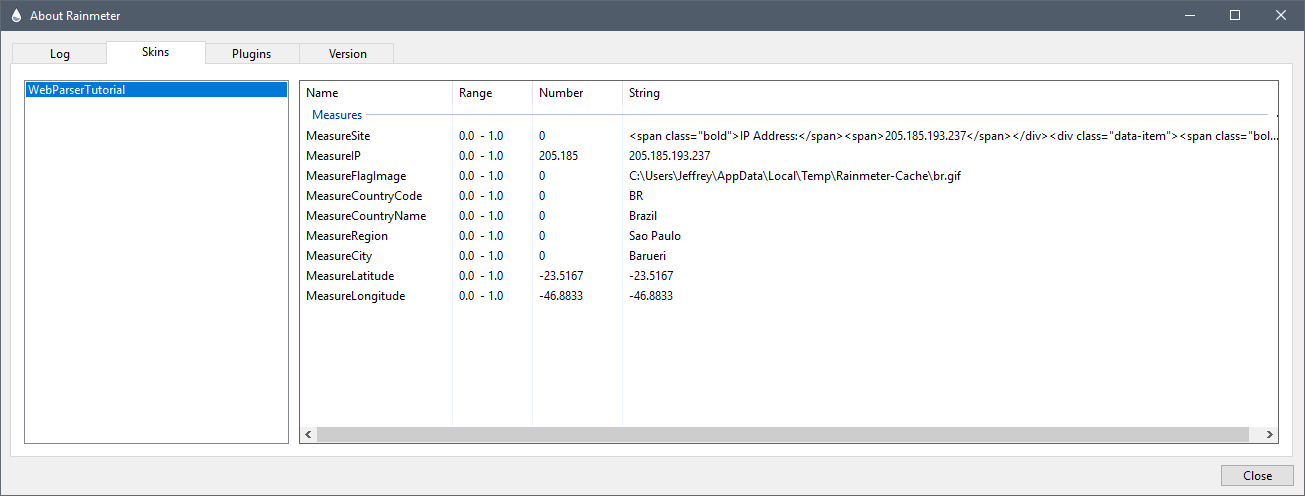
Testing as we go
You should open (and pretty much leave open while building your skin) the About / Skins dialog. In this panel you can see the values of your measures as you save and refresh your skin. You will be able to tell at a glance whether you are getting the values you expect from your RegExp. If there are problems, be sure to check the About / Log panel for any error messages.
The rest of our child measures
Now let's get the next bit of information we want from the website. (Remember, the RegExp reads the website in order from top to bottom, so you need to use the correct order in the "RegExp=" statement. You can display the information in any order you want on your skin however.)
The next information in the WebParserDump file that we want is the local path and name of the country flag image.
<div class="data-item"> |
So we want to add to our "RegExp=" statement, search for the flag image name, and return the result in the next StringIndex on the parent measure:
[MeasureSite] |
So after the first pair of start/stop searches we already did, we are adding:
.*<span class="bold">Country:</span>.*<img src="(.*)">
This will tell RegExp to skip everything until it finds <span class="bold">Country:</span>.*<img src=" and then capture everything until it sees "> and put it in StringIndex=2. The result in my example will be ../static/img/flags/br.gif.
Downloading an image
What we really want is not the file name of the flag image, but the image itself. WebParser can easily do this.
As long as the value from the parent measure that is returned in the StringIndex number is the URL to an image file, you can simply add the Download=1 option to the child measure, and the image will be downloaded. The value of the child measure will then be the full local path to the file in the Windows TEMP folder Rainmeter will create.
However, wait.. that value "../static/img/flags/br.gif" is not a full URL to the image. It is a "relative path" to the image on the remote server. That's ok, we can still get it.
[MeasureFlagImage] |
What we are doing is appending the first part of the URL, the one we used on the parent measure to the beginning of the URL option, followed by the reference to [MeasureSite] and the StringIndex=2 option. Then we add Download=1 and that full URL of https://www.geoiptool.com/../static/img/flags/br.gif will be used to retrieve the image file.
The value of the child measure will in my case be:
C:\Users\Jeffrey\AppData\Local\Temp\Rainmeter-Cache\br.gif
Which we can use in an Image meter later to display it.
Our next child measure
Now we want to get the full name of the "Country". That can be found in the same section of the HTML that you got the flag image from. In this case it is "Brazil".
<div class="data-item"> |
So we want to add to our "RegExp=" statement, search for the country name, and return the result in the next StringIndex on the parent measure:
[MeasureSite] |
So after the start/stop searches we already had on the RegExp option, we are adding:
(.*)</span>
This will tell RegExp to capture everything until it sees </span> and put it in StringIndex=3.
However, as you can see from the HTML above, the country name resides on its own line, with the only easy way to capture it being to capture everything from the > at the end of the flag image name, to the </span> on the line after the country name. That's ok, we will deal with that in our next child measure.
[MeasureCountryName] |
Embedded in the information we captured for the country name were some number of TAB characters, and two LINEFEED characters. We don't want to keep those, so we use a Substitute option to remove them. In this case we are just left with Brazil as the value.
Our next child measure
Now we want to get the "Country Code" that the flag image represents. That is contained in the HTML in:
<div class="data-item"> |
So we once again want to add to our "RegExp=" statement, search for the country code, and return the result in the next StringIndex on the parent measure:
[MeasureSite] |
Note that we want the first code BR, and not the second (BRA), so we end our search at the ( parentheses character. Be sure you \ "escape" characters reserved in regular expression when you use them as a literal!
So after the start/stop searches we already had on the RegExp option, we are adding:
.*<span class="bold">Country Code:</span>.*<span>(.*)\(
This will tell RegExp to skip everything until it sees .*<span class="bold">Country Code:</span>.*<span>, and capture everything until it sees ( and put it in StringIndex=4.
And so on...
Carry on like that until you have retrieved all the data you want from the website. Here is the final parent measure with the completed RegExp:
[MeasureSite] |
and the rest of the child measures:
[MeasureRegion] |
The meters
Once you have all the information captured by the parent measure and individually retrieved by the child measures, you can use the values of those measures in meters any way you like.
We won't go into any explanation of how the meters work in this guide, but if you use this code:
[MeterBackground] |
You will end up with a final skin that looks like this.
You can download the completed .rmskin here:
Download WebParserTutorial.rmskin.
I hope this guide will help you get started with WebParser. It is one of the most powerful features of Rainmeter.
Again, tons of additional help for regular expressions in Rainmeter can be found at: Regular expression options.