Distributing Skins (.rmskin)
Rainmeter includes tools that make it easier to share skins that you have created with other users. This page describes how to use the Skin Packager feature, and offers some guidelines for distributing a new skin in a public gallery, such as deviantArt.
Skin Packager
The Skin Packager is used to create a "package" file that contains all of the files needed to install a skin in Rainmeter.
The package file is created in the "Rainmeter Skin Installer" format, with the extension .rmskin. The file is actually a modified zip file, with the addition of certain metadata that is used to verify the integrity of the package. (As of version 2.3, Rainmeter will not install a normal ZIP file changed to the ".rmskin" extension; the package must be created with the Skin Packager.)
To launch the Skin Packager, open the Manage window and click the button labeled Create .rmskin package... in the bottom-left.
Step 1: Information and Components
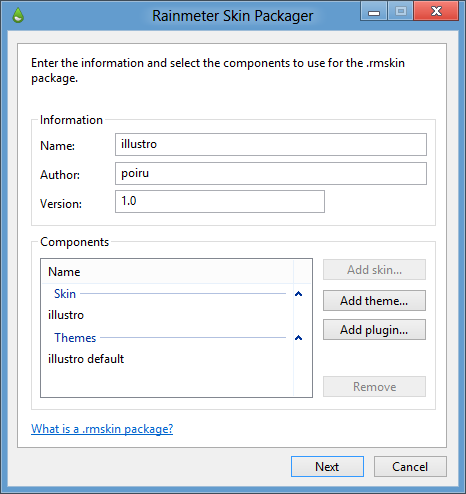
Start by providing some basic information about the skin:
Name:
The name of the skin. (Required.)Author:
The name of the skin's author. (Required.)Version:
The current version of the skin. This can be a number (such as "1.0"), a date ("15 November 2008"), or any other identifying string. (Optional.)
Next, choose the files that will be added to the package:
Add skin...
Choose the root config folder of your skin. This is the folder that will be copied to the user's Skins directory when the skin is installed. It must be a single folder that contains the entire skin or skins, including any resource files needed, such as addon utilities or fonts. You may choose a folder from your own Skins directory, or somewhere else on your computer. Only one root config folder is allowed in a single package. (Required.)Add layout...
You may choose any number of layouts to be installed along with the skin.-
Add plugin...
You may choose any number of plugins to be installed along with the skin. Only custom plugins should be distributed in this way. The standard plugins described in this manual are included with all versions of Rainmeter, and never need to be installed separately. To include a custom plugin, you must provide both the 32-bit and 64-bit versions of the plugin to ensure compatibility on all systems.
Click Next to continue.
Step 2: Options
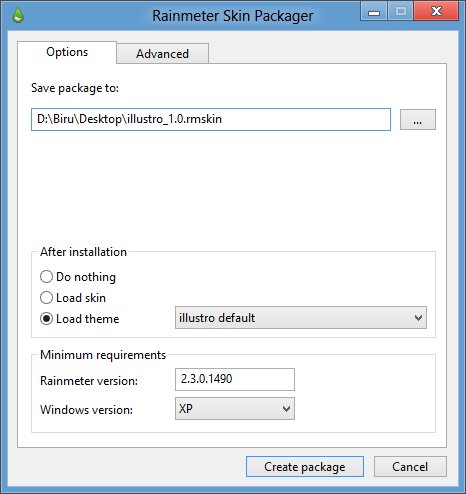
All of the following fields are optional. The default settings are appropriate for most skins.
Save package to:
Choose where the new package file will be created. Defaults to the current user's Desktop folder.-
After installation
You may choose one of two actions for Rainmeter to take after installing the skin. (Before installing, the user will have the option to skip this action.)Load skin:
You may choose one of the skin ".ini" files in your package. This skin will be automatically loaded alongside any other skins that the user is already running. This setting is recommended for most skins.Load layout:
If you added any layouts to the package, you may choose one layout to be loaded automatically, replacing the user's existing layout.
-
Minimum requirements
You may set the minimum versions of Rainmeter and/or Windows required for the skin. Rainmeter will not install the skin on a system that does not meet these requirements.Rainmeter version:
Defaults to the current version of Rainmeter on your system. If you are sure that the skin will work on an earlier version, you may change the minimum requirement accordingly. Rainmeter version numbers are written in the form Major.Minor.Patch.Revision. For example, Rainmeter 4.0.0 (r2551) would be written as4.0.0.2551.
Note That the revision number is just a minimum, intended to allow you to target a specific build of Rainmeter. So to target the .rmskin at any revision of 4.0 or later you can leave off most of the number, and just use4, target any revision of 4.2 with4.2or a specific revision number with4.2.0.3111.Windows version:
Defaults to Windows 7, which is the lowest version of Windows supported by Rainmeter 4.0 or later. Some skins may require higher versions of Windows, depending on their plugins, addons, or other factors. You can set this to a lower version of Windows, but should only do so if you are targeting a Rainmeter version less than 4.0, such as3.3.0.2519.
Step 3: Advanced
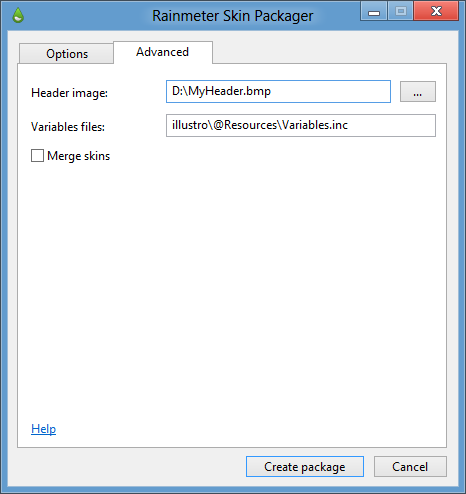
For additional options, click the Advanced tab at the top of the window.
Header image:
You may choose a custom header image to be displayed in the Skin Installer. The image must be a bitmap image (.bmp) that is exactly 400x60 pixels in size.-
Variables files:
Some skins have one or more include files to store variables that can be changed by the user. If a user is reinstalling or upgrading a skin that they already have in their library, they will most likely want to preserve their existing preferences. You may specify these files in your skin package, so that the existing variable values are used instead of the defaults in the package.Specify the file location starting with the root config folder, e.g.
illustro\Clock\Variables.inc. You may specify multiple files by separating them with pipes (|), e.g.illustro\Clock\Variables.inc | illustro\Feeds\Variables.inc.Note: This option is not compatible with the Merge skins option.
-
Merge skins
If selected, the Skin Installer will not remove any existing files found in the user's Skins directory. (Normally, the root config folder is removed and replaced with the version in the skin package.) This can be used to install an "expansion" or a "patch" to a previously-installed skin, without duplicating unchanged files.Note: This option is not compatible with the Variables files option.
Finally, click Create package to complete the process. It may take several seconds to create the package, depending on the size of your skin. The file will be saved in your chosen location as Name_Version.rmskin (using the "Name" and "Version" fields that you entered in the first step).
Hidden Files
The Skin Packager will ignore any hidden files or folders in your root config folder. You can take advantage of this behavior by storing development files (such as Photoshop "PSD" files, or backup copies of skin code) as hidden files, so that they are excluded from the final product.
Publishing Guidelines
When distributing a skin to a small or private group of users, strict adherence to standards probably isn't too important. However, you may want to publish your finished work in a public repository like the Rainmeter skin galleries on deviantArt for other users to discover, download and share. In this case, taking the time to follow a few simple guidelines will be helpful to you, your users, and the Rainmeter community at large.
Use the Skin Packager.
Most sites that allow users to publish their Rainmeter skins now require the skins to be uploaded in the official ".rmskin" format created by Rainmeter's built-in Skin Packager. This is not only more convenient for regular users, since a skin package can be installed automatically in just a few clicks—it is also safer. Rainmeter always checks the validity of a skin package before installing it, to ensure that the package was created by the Skin Packager and not modified or tampered with in any way.
As with any open-source software ecosystem, malware disguised as Rainmeter skins has been an occasional concern for the community. By using the official format, you can help us reduce this concern by promoting a more secure method of distribution.
Use metadata.
Many skin authors tend to ignore the [Metadata] section in their skins, because it has no effect on a skin's function or performance. But there are good reasons to make sure your skin is fully-tagged before you release it into the wild. A skin with complete metadata is easier to find in the Manage window, and offers a reliable, built-in way to provide users with setup and usage instructions, or at least direct them to a webpage or readme file with more information.
In addition, because a skin's code is often copied or excerpted in posts and comments across the Internet, good metadata makes it easier to trace the code back to its source. The Version tag is especially helpful to avoid confusing multiple revisions of the same skin that have been released at different times.
Choose the right license for your skin (and respect others').
The Rainmeter community is built around a free, open exchange of ideas and resources. We wholeheartedly encourage skin authors to release their works under terms that allow other users to borrow their code and concepts, modify them, and release them in a new, unique form. We believe that this kind of frictionless collaboration is a big part of what has made the Rainmeter ecosystem thrive.
There are a number of open-source software licenses available, and it couldn't be easier to add them to your Rainmeter skin: just paste the name into the License tag in your [Metadata] section. The following licenses are commonly used for Rainmeter skins, plugins and addons:
That said, the same rule applies to Rainmeter skins as it does to any other content on the Internet: if you are not explicitly given permission to use it, you don't have permission. You really need some indication of consent from the creator - even a quick email is enough. In addition, it's always a good idea to credit the original creators when you post your own skin, even if their license doesn't require it. This means not only the original author of some code that you have modified, but also any images, addons, plugins and fonts that are not your own.
Make sure your license and credits are included both on your download page (for example, in the deviation comments on deviantArt) and somewhere in your skin package (either in your metadata tags, or a separate "readme" file).
Clean up your layouts.
The ability to include a custom layout with your skin can make for a great presentation, especially in a large "suite", where it is helpful to provide a template or starting point for your users to get started on customizing their desktops instead of loading skins one by one.
While arranging a layout on your own desktop, and using the Manage window to save it to a file, there are some steps you can take to make your layout load smoothly and cleanly on other users' desktops:
Remove [Skin] sections that don't belong to your suite. An easy way to keep only the sections you need is to check the "Exclude unloaded skins" option when saving the layout.
Remove options from your skin sections if they are unchanged from Rainmeter's default settings, such as Draggable or SnapEdges. This will both reduce the size of your layout file, and make it easier to keep track of your code if you need to edit any layout settings by hand.
-
Use the "From right" and "From bottom" options to make sure your skins are loaded in the correct position regardless of the user's screen resolution. If you need to determine the skin's position in a more complex way, you can edit the "Rainmeter.ini" settings file for your layout and write your own formulas for the WindowX, WindowY, AnchorX and AnchorY options for each skin section, using built-in variables. Here are some basic formulas you can use:
Center a skin on the desktop:
WindowX=(#WORKAREAX# + (#WORKAREAWIDTH# / 2 ) - (SkinWidth / 2) + Offset)1
WindowY=(#WORKAREAY# + (#WORKAREAHEIGHT# / 2 ) - (SkinHeight / 2) + Offset)Center a skin on the screen:
WindowX=((#SCREENAREAWIDTH# / 2) - (SkinWidth / 2) + Offset)
WindowY=((#SCREENAREAHEIGHT# / 2) - (SkinHeight / 2) + Offset)Align relative to the left edge of the desktop:
WindowX=(#WORKAREAX# + Offset)Align relative to the right edge of the desktop:
WindowX=(Offset + SkinWidth)R
or
WindowX=(#WORKAREAX# + #WORKAREAWIDTH# - SkinWidth - Offset)Align relative to the top edge of the desktop:
WindowY=(#WORKAREAY# + Offset)Align relative to the bottom edge of the desktop:
WindowY=(Offset + SkinHeight)B
or
WindowY=(#WORKAREAY# + #WORKAREAHEIGHT# - SkinHeight - Offset)
1. "Offset" should be a number, e.g.
25R,-10B,(#WORKAREAX# + 75). If you don't need an offset (the skin is exactly centered or adjacent to the edge of the screen), leave it out. "SkinWidth" and "SkinHeight" should be the probable width and height of the skin.