System
Introduction
With this tutorial, we are going to cover several things. First, we are going to introduce two new measure and two new meter types, as well as some new options for controlling how they work. We will also touch on the use of UpdateDivider on measures to control the performance of a skin, and will explore using Variables to set, use and change values shared by measures and meters.
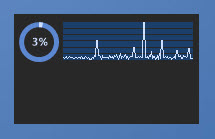
There is a lot going on in this skin, so let's explore the end-result a bit so you can get a sense of where we are going as we work through it. First, let's take a look at the final skin.

What we are going to do is measure the percent usage of the CPU, and the space on a couple of hard drives. Then we are going to create some circular meters showing the usage with Roundline meters. We are going to monitor the CPU with a Line meter, and display some information about the space on your hard drives. You only see one hard drive in that image? We will get to that...
Building the System skin
First, as we did in our earlier tutorial, let's add the [Rainmeter] section to control the Update speed of the skin.
[Rainmeter] |
The next thing we are going to do is define some variables for the skin. Variables are used to create a value, which can be used repeatedly in the skin by enclosing the variable name in ## (example: #VarName#). In order to change the value in all places it is used, you only need to change it one time in the [Variables] section of the skin.
[Variables] |
Now we will cheat a bit. In earlier tutorials, we waited until the end and put a solid background on the skin using an Image meter. Let's go ahead and add that now, so we can demonstrate the first use of one of those variables we created above.
[MeterBackground] |
Note that we have used the variable #AlmostBlack# in the SolidColor option for this meter. The meter will then use the value we defined as AlmostBlack=40,40,40,255 in the [Variables] section earlier. Remember that if you define SolidColor on an image meter with no MeasureName option, it simply draws a square or rectangle based on the W and H (width and height) options.
So let's load our new skin and take a look at where we stand. From the Manage dialog, find the System.ini entry in the list and click on the Load button on the upper right.

Not much to look at just yet...
Next, let's create a measure to get the current amount of CPU usage, as a percentage, on each update.
[MeasureCPU] |
Now it is time to introduce a new meter type. We are going to display the value of that [MeasureCPU] measure as filling a cirle on the screen using a Roundline meter. Create a new section with this code:
[MeterCPUCircle] |
Refresh the skin so we can see what it is doing as we walk through the options.

What the Roundline meter does is draw a line that rotates around the center of a circle defined by the W and H options of the meter. In this case, we have defined the size of the meter (and thus the circle) as 40x40 pixels. Keep in mind that this defines a circle that has a total width of 40 pixels, and a width from the center to the edge as 20 pixels.
Roundline - Working with angles
We first needed to define two options to control how the meter works. We need to tell the Roundline where the line should point when the value is 0% (the starting point). This is done with the StartAngle option. We also need to tell the Roundline how much of the circle to use as 100% (the distance to travel when the value is 100%). This is done with the RotationAngle option. As you can see, we have set the value of StartAngle to StartAngle=(Rad(270)), and the value of RotationAngle to RotationAngle=(Rad(360)). Let's talk about that for a minute.
The angles in a Roundline meter are defined in Radians. Radians are a unit of measure used to define degrees of distance around a circle, starting with 0°, which is the point directly to the right of the center of the circle. This is important! Do not picture a compass in your head, which has 0° (North) pointing "up". Radians are defined with 0° pointing to the right.
I highly recommend taking a minute and reading through the explanation at Radians Guide.
So beginning with StartAngle, we are telling the Roundline that the starting point of the meter is a distance of 270° degrees in radians from the 0° position of directly right. That will move the starting point around clockwise to the "top" of the meter, which is what we want.
Next, we are setting the RotationAngle option to 360° degrees in radians, which tells the Roundline that the distance to travel around the circle from the starting point defined in StartAngle will be the full circle (a circle has 360 degrees). We want the entire circle to fill when the value of the measure is 100%.
Note that we are using the Rad(x) function to make it easier to convert degrees (which are easy to picture in our heads) into radians (which are mathematically useful, but stupidly complicated).
Roundline - The line options
By default, the Roundline meter will draw a single line from the center of the meter to the outside edge, pointing to the position represented by the value of the measure. We don't want a "pointer" in this case, but want to draw and fill a circle. There are few options we have used to control this.
- LineStart=15
This tells the Roundline that we want the line to start 15 pixels from the center of the meter. - LineLength=20
This sets the overall length of the line to 20 pixels. Remember that our meter is 40 pixels wide in total, but only 20 pixels wide from the center to the outside edge.
The result of these two options is a line that starts 15 pixels from the center, and extends to the full 20 pixels defined as the length from the center to the edge. So in effect, a 5 pixel line at the outside edge. - Solid=1
This option tells the Roundline that instead of a single line, we want the meter to "fill" from the position defined as 0% to the current value represented by the measure. So instead of a "pointer", we get a circle being filled as the value changes.
Then we are using one of the variables we defined in the [Variables] section at the beginning. We want to set the color of the circle to a nice light blue, which we defined as LightBlue=207,224,255,255. So we set the option in the Roundline meter to LineColor=#LightBlue#.
Good job! Roundline is a very useful and flexible meter type in Rainmeter, and once you play with the options and different behaviors you will find lots of creative ways to use it. Take a breather...
Continuing the skin
That Roundline meter looks a little funny by itself, so let's add another Roundline meter to serve as a "background" for it. In your code, move up above the [MeterCPUCircle] section we added before, and insert a new meter section. Remember, we want this meter to be "behind" [MeterCPUCircle], so it needs to be "before" it in the actual .ini skin code.
[MeterCPUCircleBack] |
What we are doing here is creating another Roundline meter, at the same X and Y position as the one that comes after, but behind it. All of the options in [MeterCPUCircleBack] are the same as those in [MeterCPUCircle], with the exception that there is no MeasureName option to "bind" a measure to the meter. Roundline will by default use a value of 100% in this case, in effect allowing us to draw a full circle that we can use as a background. Oh, we also used a different variable for the color of the line. Refresh the skin to see the change.

Your entire skin code should now look like this:
[Rainmeter] |
Next we want to create a String meter showing the actual value we are getting in the [MeasureCPU] measure, and center it inside our circle. We have talked about string meters and positioning in earlier tutorials, so let's just add the following as a new section at the end of your skin code.
[MeterCPUPercent] |
Save and refresh the skin to see your new meter.

You know, it would be nice if the color of that text changed when the CPU usage hits some value we define. What we can do is change the color to "red" if the value is at or above 25%, and back to "blue" if it is below that value.
Go back near the top of the code and find the the [MeasureCPU] measure. Let's add a few lines to it.
[MeasureCPU] |
This is using IfAction options to do the following:
- If the value of the measure moves above 24, use the !SetOption bang to change the FontColor option on the [MeterCPUPercent] meter to the value of the variable #LightRed# we defined earlier in [Variables].
- If the value of the measure falls below 25, use the !SetOption bang to change the FontColor option on the meter to the value of the variable #LightBlue# we defined earlier in [Variables], in effect changing it back to the original color.

Line meter
Next we are going to touch on another meter type in Rainmeter. The Line meter displays the percentage value of a measure (or more than one measure) as a series of points over time, connected to create lines on a graph.
Add a new section to the skin.
[MeterCPULine] |
The Line meter is pretty self-explanatory, you "bind" one or more measures to the meter with MeasureName, and then use options like LineWidth and LineColor to control how the meter looks. The line is plotted over time on a graph that is defined by the W and H options of the meter. The additional HorizontalLines and HorizontalLineColor options draw the background lines on the graph, in the desired color. Finally, we set a SolidColor option on the meter to define a overall background color. Refresh the skin and have a look. Let it run for a while so you can see the movement of the line.
We should put a label on the Line meter, so it is clear what it is measuring. We have looked at the String meter previously, so let's just add one and take a look at the result.
[MeterCPUText] |

Measuring a hard drive
It is time to introduce a new measure type to our skin. We are going to be measuring the total, used, and free space on one of your hard drives. We will display the used space on a circular Roundline meter almost exactly as we did with the CPU measurement, then display the other information, total and free space, in string meters next to it.
First, let's set up the measures you will need. Back up in your skin code, right under the [MeasureCPU] we created in the beginning, and add some new measures.
[MeasureDriveTotal] |
The FreeDiskSpace measure obtains space information about a drive. There are several options we are using that should be explained.
- Drive=#CurrentDrive#
This option tells the measure which drive to examine. In this case, we are using one of the variables we defined earlier, to set the value to C:. - IgnoreRemovable=0
By default, FreeDiskSpace will ignore all removable drives like USB or optical drives. Set IgnoreRemovable=0 to enable measuring these kinds of drives. - InvertMeasure=1
By default, FreeDiskSpace will measure the free space on a drive. To measure the used space, you use the General Measure Option InvertMeasure=1 to reverse what is measured.
In addition, we are using two other options on the measures we have not looked at before.
DynamicVariables is used to tell a measure or meter that any variables used in the section should be re-evaluated on each update of the section. In order to have Rainmeter use as few resources as possible, variables are only evaluated when the measure or meter is created, and will not detect any dynamic changes to variables it uses, if this option is not set. It will become clear in a little bit why we want this option on our FreeDiskSpace measures.
UpdateDivider is used to control how often a measure or meter is updated. The overall Update of the skin is set in the [Rainmeter] section at the top of the skin, and defines how often in milliseconds the skin is updated. In our case, and by default, this is Update=1000 or once a second.
The UpdateDivider=5 option we are setting on these FreeDiskSpace measures tells Rainmeter to update these measures every 5 updates of the skin, or in our case every 5 seconds. UpdateDivider should be considered for any measures that don't need to be updated as often as the Update option alone, to reduce the amount of work that Rainmeter has to do. In the case of FreeDiskSpace, this is particularly useful as actually reading the drives once every second would be more resource hungry than is really needed.
See the guide at Update Guide for a lot more detail and explanation.
Ok, our measures are all set up, and providing the various kinds of space measurements for our drive in bytes. One thing that should be noted is that the FreeDiskSpace measure also automatically sets the MinValue and MaxValue of the measure, so the value can be used in meters that require a Percentage, like the Roundline meter we are about to create.
Add the following new meters to the skin.
[MeterDriveCircleBack] |
Note that these are pretty much identical to the meters we created earlier to show the CPU usage as a circular Roundline meter. We bind the active Roundline meter [MeterDriveCircle] to the measure [MeasureDriveUsed] to display the amount of "used" space, and instead of showing any measured value inside the circle in [MeterDriveCircleLabel], we simply create a label with the value of the current drive letter we created in the variable #CurrentDrive#. We again set DynamicVariables=1 on this label meter. We will see why shortly. Save and refresh the skin to see how we are doing.
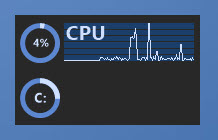
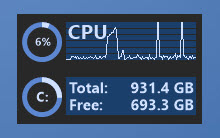
Finally, we can create a nice background to match the one behind the Line meter we created in [MeterCPULine], by simply creating an Image meter with a SolidColor and no MeasureName option, then some String meters to display the other drive space information, total and free. Add the following meters to the bottom of the skin. Save and refresh.
[MeterDriveBack] |
One new option we have used in two of these meters should be explained. The FreeDiskSpace measure obtains the space values from the drive in bytes. For most of us, that is going to be a really huge and long number, (my one-terabyte C: drive has a total of 1000097181696 bytes for instance) and probably not one we want to display on a skin. The AutoScale option on the string meter will automatically scale the number to megabytes, gigabytes, terabytes etc. and append the appropriate M / G / T label to the end. We have added an extra hard-coded B at the end of the text, so it will display as for instance: 931 GB. Let's take a look.
What about those dynamic variables?
I promised we would get back to the reason why we added DynamicVariables=1 to a few measures and meters. Our last goal is to have the skin dynamically change the Drive that we measure and display when we move the mouse over the skin.
If you look back to the [Variables] section, you will see that we set the following:
CurrentDrive=C: |
Then in our FreeDiskSpace measures [MeasureDriveTotal], [MeasureDriveFree], and [MeasureDriveUsed], we set the Drive option to that variable #CurrentDrive#. So to start with, the measures are looking at the C: drive. What we want to do is set the value of #CurrentDrive# to be equal to the value of the variable #Drive2# when we move the mouse over the skin, and back to #Drive1# when we move the mouse away.
To accomplish this, we need to add new Mouse actions to the skin, and some Bangs that are executed by the mouse actions.
Let's go back up to our [MeterBackground] meter, the first one after the measures in the skin. Change it by adding our mouse action lines.
[MeterBackground] |
What this is saying is:
- If the mouse moves over the background meter, use the !SetVariable bang to change the value of the variable CurrentDrive to the value of the variable Drive2.
- If the mouse moves away from the background meter, use the !SetVariable bang to change the value of the variable CurrentDrive to the value of the variable Drive1, or in effect back to the original value.
- Then we are using the !UpdateMeasure, !UpdateMeter, and !Redraw bangs to have the change take place as soon as we move the mouse over or away, and not wait for the next update of the skin.
This functionality is why we added DynamicVariables=1 to the measures and meters which are using the #CurrentDrive# variable. That option allows the measures and meters to re-evaluate the variable on each update of the section, so when we change it with !SetVariable they react to the change.
So we are finally there... Great job! Here are two shots of your final skin, the first with the mouse away from the skin and the second with the mouse over the skin.
Mouse Off
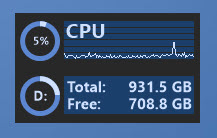
Mouse Over
And here is the final code so you can compare to yours.
[Rainmeter] |