Customizing
Now that you are familiar with Rainmeter's basic user interface, you're ready to start customizing Rainmeter to your liking.
Finding Skins
There is no official, central repository of Rainmeter skins. Rainmeter is an open platform, and skins can be found all over the Internet, from large screenshot galleries to small personal blogs and websites. That said, there are a few major sites where the Rainmeter community tends to gather:
Rainmeter.net
The Rainmeter homepage showcases some skins and suites from authors in the community.Rainmeter Forum
Other members of the community like to share their creations on the official boards.DeviantArt
Probably the biggest and best collection of skins, deviantArt not only has a special Rainmeter category, but also a dedicated Rainmeter Group, which is run by members of the community and features a curated stream of skins, screenshots, tutorials, interviews and more. All skins on deviantArt are checked for malware before they are accepted by the group. Note: An account is needed to download skins.GitHub
Skins can be found under therainmeter,rainmeter-skin,rmskintags.
Other places where Rainmeter skins/suites/desktops/inspiration can be found:
Lifehacker Desktop Show & Tell & Reddit
Be sure to browse the Lifehacker Desktop Show & Tell pool on Flickr, as well as the r/rainmeter and r/desktops subreddit on Reddit for communities full of Rainmeter users.
Malware
Rainmeter is built on an open software ecosystem. And like other open software, we occasionally have to deal with malware in our midst. Other than Rainmeter.net, the websites listed above allow anyone to upload and publish their own skins, and most sites have no policy of verifying either the identity of the uploader or the integrity of the files. We rely on members of the community to be watchful for malware and report it when found.
We recommend that you follow some simple, common-sense tips to make sure that your computer stays malware-free:
-

Whenever possible, only download skins in the Rainmeter Skin Installer .rmskin format. Recent versions of Rainmeter require new skin packages to be created by Rainmeter's official Skin Packager, which helps reduce the risk of tampering. Many older skins may still be published as .zip files that must be installed manually—these files are at greater risk of containing malware, and you should look for a newer version of the skin, if possible. You should never download a .exe file that claims to be a Rainmeter skin installer.
Make sure the skin publisher is trustworthy. An account that is new, or has very few downloads, page views, or profile detals may be suspicious. Users that disable or delete comments on their submissions are also suspicious. In contrast, a long-standing author who has many comments and downloads is more likely to be safe.
If comments are enabled on the submission, check them to see if other users have reported the skin as malware. Likewise, if you discover that a skin is dangerous, please take a moment to warn your fellow Rainmeter users, by posting a message in the comments and reporting the submission to the side administrators. Sites like deviantArt and Flickr include an easy "Report Spam" button on every page.
If you are suspicious of a skin for any reason, upload the file to VirusTotal, which will scan the file with over 40 anti-malware services and report the results to you. (Note that false positives are common; only report skins that are flagged as dangerous by a significant number of tests.)
Adding Skins

Installing a typical Rainmeter skin.
Installing a skin in the Rainmeter Skin Installer (.rmskin) format is easy. Just double-click the file to open the package with Rainmeter's built-in Skin Installer, and follow the instructions like you did when you installed Rainmeter.
(Skins that are not in the .rmskin format, but instead come in an archive file like .zip, .rar or .7z, require a few more steps. See Installing Skins for more detailed instructions, including steps for installing skins on a portable version of Rainmeter.)
Editing Skins
You have already learned how to change basic skin settings in Rainmeter. Now, it's time to learn how to make edits to a skin itself.
Remember: every skin is different. Some skins provide more customization options, tools and instructions than others, and the processes for customizing two skins may be very different. In all cases, you should look to whatever documentation the author has provided, whether in the form of a "readme" file, an online support URL, or
;commentsembedded in the skin code.
Controls
It is possible that your skin will provide some kind of built-in graphical interface for changing its own code. In this case, all you need to do is follow the instructions provided, clicking buttons and typing or pasting new text values as needed. The skin may have control buttons embedded in the skin itself, or it may summon a separate skin or addon where you can change all customization options in one place.
This kind of sophisticated control system is more the exception than the rule, and is usually found only on large suites. More often, you will need to edit the skin code directly in order to change or add your own values.
Variables
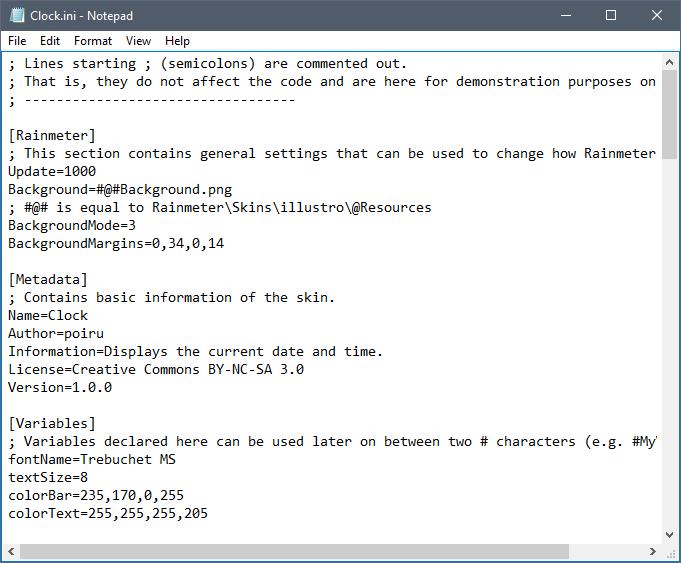
What a skin looks like on the inside.
Most of the time, a skin's customization options—that is, options that the author intends and expects you, the user, to change around—are saved as variables. To see an example, right-click the illustro "Clock" skin on your desktop, and select Edit skin. The file "Clock.ini" will open in Notepad (or your default text editor).
This is what Rainmeter's configuration code looks like. (Click the image on the right to zoom in.)
Although it may look complex, everything in this file is actually one of three basic elements:
A section. Section names are contained in brackets (
[]) and are used to "declare" some property of the skin.A key. Keys are found at the beginning of each line in a section, followed by an equal sign (
=).A value. The value is whatever meaning is assigned to a key—everything after the first equal sign (
=) is the value. (Values must be constrained on a single line.) In Rainmeter, the pairing of a key and a value is called an option.
[Section1] |
When you're editing variables in a skin, the values are what you are going to change.
Scroll down in your text editor to the section called [Variables]. Here's what it looks like. (Code examples in this manual are highlighted to help you easily identify sections, keys and values.)
[Variables] |
Try changing one of these variable values. Go to the line that begins with the fontName key, and change Trebuchet MS to another font - say, Times New Roman:
fontName=Times New Roman
Then, save the file.
Refresh
The refresh action is important in Rainmeter. The effect of refreshing a skin is the same as if you had unloaded and then re-loaded the skin. When this happens, all dynamic variables and other options are reset according to their original values in the skin file, and all measures restart from the beginning. Refreshing a skin is also necessary to apply any changes that have been made to a skin's files.
You can refresh any skin by selecting Refresh skin in the context menu, or browsing to the skin in Manage and clicking the Refresh button in the top-right.
It may be ugly, but it's different.
When skin files have been added, renamed or removed, you will need to refresh the entire Rainmeter application in the same way. You can do this by selecting
Refresh allin the context menu or the bottom-left of the Manage window.
Try refreshing the Clock skin that you edited before. You will see the skin's font face instantly change.
You have now edited your first skin! This is the same basic process that you will use to customize, modify, and eventually create skins of your own.
Going Further
If you don't find the option that you want to change in the [Variables] section, and the author has provided no other instructions, then your objective goes beyond merely "customizing" a skin: you will need to actually modify the skin away from the original author's design.
This is not only possible—we actually encourage it! Breaking down the pieces of someone else's creation and building something new with them is one of the best ways to learn Rainmeter. Modifying skins and creating new skins involve basically the same skills and require an understanding of the same core concepts. It is the tweakers, the experimenters, who get the most out of the tools that Rainmeter has to offer.