Creating Skins
What You Need
An enhanced text editor with code highlighting makes a big difference.
Here's what you need to create Rainmeter skins:
- Rainmeter.
- A text editor.
And that's all. No extra software or materials of any kind are required.
Text Editor
That being said: while you can edit skins using Windows' built-in text editor, Notepad, we strongly recommend downloading an enhanced text editor, such as Notepad++ or Sublime Text. These applications come with powerful features like tabs, auto-completion, embedded file browsers and more. You can even download extensions that add Rainmeter-specific code highlighting, which makes it much faster and easier to read a skin's code and spot errors.
For more information, see Notepad Alternatives.
Image Editor
Depending on the kind of skin you want to make, you may also want to find a good piece of image editing software. Rainmeter can create text by itself, as well as simple or complex vector shapes, like rectangles and circles. But you will find you often want a separately-created image file.
Adobe Photoshop is the usual gold standard for image editing, but there are other, less expensive alternatives worth considering, such as Paint.NET, GIMP, or Inkscape.
Configs
A skin can grow to become an enormously complex project by the time it's done. It may accumulate any number of images, icons, fonts, plugins, addons, scripts, and even included code that is strewn across multiple files and shared by other skins.
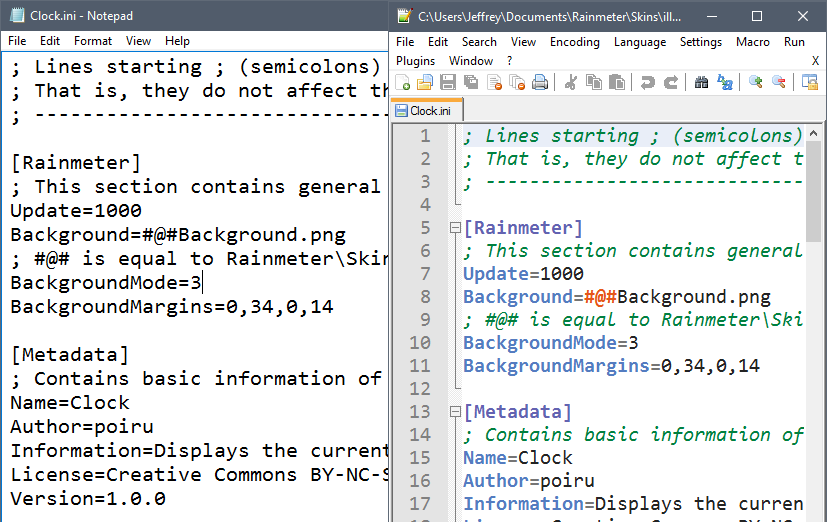
But at the core of every skin is a single .ini file. Named SkinName.ini—where "SkinName" is the name of the skin—this is a text file that contains the fundamental code that Rainmeter uses to create a working skin.
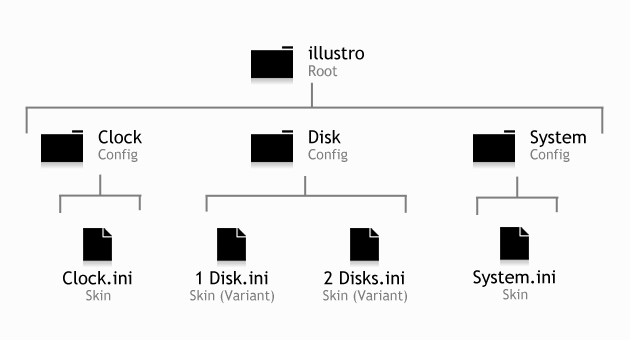
Because a skin may have any number of variants, skins are typically identified not by their file name, but by the folder where they are located. This is known as the skin's config name. To quickly find out a skin's config name, just check the context menu—the first item is the config name. For example, the illustro "Clock" skin's config name is illustro\Clock.
Each skin also has a root config folder. This refers to the one folder that contains all of the skins belonging to a "suite," such as illustro. When the skins in a suite are organized together in this way, they can be exported to a package, and then installed on another system, as a single collection. They can also share fonts, images and other resources in a way that separate skins cannot. For a simple skin that is not part of such a "suite," the config and root config are the same.
Here's a quick reference chart to help you remember the relationship between skins, configs, variants and roots, using illustro as an example:
Root config folders are all organized in Rainmeter's main Skins folder:
C:\Users\YourName\Documents\Rainmeter\Skins
Accordingly, you can identify any skin by its file path, according to a simple rule:
C:\Users\YourName\Documents\Rainmeter\Skins\ConfigName\SkinName.ini

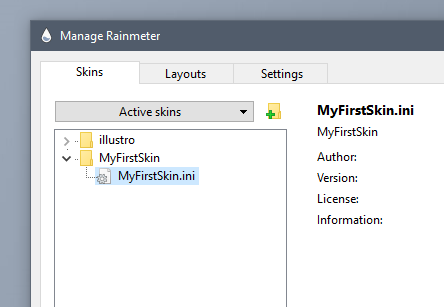
The illustro "Clock" skin in the Skins folder. Remember that skins are identified by their config name, e.g. "illustro\Clock".
Your First Skin
Until now, you have been working with the pre-made illustro skins that come with Rainmeter. Now, you're going to create a new skin from scratch.
Creating a new skin is quite easy. In Manage, click the "Create new skin" button. This will create a new config folder in the skins list, offering a default starting name of "NewSkin". Name this folder "MyFirstSkin" and hit enter.
This will do several things. It will create a new root config folder with the name "MyFirstSkin". In it it will create an empty @Resources folder, will create a new basic MyFirstSkin.ini skin file, and will open this new skin in your default or defined text editor, so you are off and running.

Your new skin is created in the proper folder, and ready to work with in Manage and your text editor.
The "Hello, World!" Skin
The very first thing you will see in your skin is the [Rainmeter] section. This is a skin's "header" property, like the <head> tag in an HTML webpage. In the [Rainmeter] section, you will see an Update=1000 option. Like this:
[Rainmeter] |
The Update option is what sets the length of the skin's update cycle. The length is given in milliseconds, or 1/1000ths of a second, so Update=1000 means that the skin will update once per second. Updating is how the skin will react to changes in information. You'll see how this works in more detail later on.
Now that you've given your skin a "head," it's time to give it a "body." Let's change that default string meter. This is one of the most common types of meters, and it is used to create text.
[Rainmeter] |
The Meter option is required to tell Rainmeter that this section is, in fact, a meter. All meters have this option. The value of the option determines what type of meter it is.
The Text option, on the other hand, is unique to the string meter. As you might have guessed, this is where you provide a string of text for Rainmeter to display.
Believe it or not, what you have now is a complete, valid, working Rainmeter skin! Let's load it to see what it looks like. Load the skin using one of the methods that you learned before. You can either:
Open the Manage window by left-clicking the Rainmeter tray icon, find
MyFirstSkinin the skins list, then click theLoadbutton in the upper-right.Open the context menu by right-clicking the tray icon, then select
Skins→MyFirstSkin→MyFirstSkin.ini.
(As you get comfortable with Rainmeter's user interface, you'll decide whether you prefer working with the context menu or the Manage window.)
Now, look up in the top-left corner of your desktop. There's your skin!
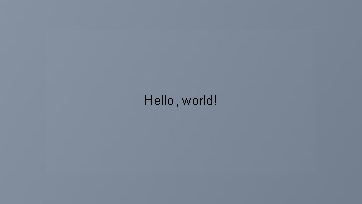
Can you see me?
It's... not very big. Or pretty. Meters without any options tend to be very simple and unimpressive. So let's add some formatting.
[MyMeter] |
Here's what we've added:
AntiAlias
A general meter option that smooths out the edges of a meter. This almost always improves the appearance of a string meter.FontColor
A color option that changes the color of the text in this meter.FontFace
An option that changes the font used for this meter. Rainmeter can use any font that you have installed in Windows, or another font in a skin's @Resources folder—but we'll get to that.FontSize
The size of the font.
Now, let's apply these changes by refreshing the skin. Once again, you can either press Refresh in the Manage window, or MyFirstSkin → Refresh skin in the context menu.

Much nicer.
Congratulations! You have just created a new skin. You are now ready to move on to the Basic Tutorials. This series will guide you through the entire process of creating several example skins, while teaching you about the fundamental elements of a Rainmeter skin.