Launcher
Creating a new skin
Let's create a new folder under Skins, where we will store all of the skins we create in these tutorials. We want to keep them together in one root config folder, so we can later look at how to share some settings and resources between them.
In Windows Explorer, create a new folder called Tutorials. Under that folder, create another new folder called Launcher. In that Tutorials\Launcher folder, create a new empty text file. In Windows explorer, you can simply right-click in the folder and say "New / Text document". Give it the name Launcher.ini.
Now, left-click the Rainmeter icon in the Windows notification area on your taskbar, to open the Manage dialog. Click on the Refresh all button on the bottom left, and you should see your new Tutorials / Launcher config in the list. Find Launcher.ini in the list, right-click it and say "Edit". This will open the new skin file in your default text editor. Don't load the skin just yet, we need to add some code first...
Building the Launcher skin
First, as we did in our earlier "hello world" skin, let's add the [Rainmeter] section to control the Update speed of the skin.
[Rainmeter] |
Then, we can add our first meter to the skin.
[MeterLaunch1] |
Note that the first two things we must do is create a [SectionName] for the meter, and tell Rainmeter what type of meter this is.
[MeterLaunch1] |
This is a String meter, one of the most commonly used meters. It is used to display some text on the screen. Formatting control, like the position, size, color and font face can all be set with a combination of General meter options and the options specific to the String meter. Let's look at some we have used here.
- X and Y: These control the position of the meter relative to the overall skin. So what we are saying here is that we want this first meter to be five pixels right of the left edge of the skin, and five pixels down from the top of the skin.
- FontFace: This determines which font you want to use when displaying the string.
- FontSize: The size in points for the font.
- FontColor: The color for the text.
- StringStyle: Controls some style options for the string. We are using a Bold style.
- AntiAlias: Does font smoothing on the text, to improve the display quality.
Then we are setting the Text option of the meter with Text=Notepad, defining the string of text we wish to display. String meters can also use the value of Measures as the text to display, we will go into that in more detail in a future tutorial.
The last two options in the meter are what really makes this into a "launcher", and not just some text on the screen.
- SolidColor=0,0,0,1: This is a little trick used to create a solid but invisible "box" behind the string meter, to make clicking on the text easier.
- LeftMouseUpAction=["C:\Windows\System32\Notepad.exe"]: This is a mouse action, telling Rainmeter to take the defined action option when the meter is clicked with the mouse. In this case, we are launching the application Notepad.exe found in the folder C:\Windows\System32\. We will go into much more detail on different types of actions and Bangs in future tutorials.
So let's load our new skin and take a look at where we stand. From the Manage dialog, find the Launcher.ini entry in the list and click on the Load button on the upper right.

Drag the skin anywhere on the screen you like. Rainmeter will remember the position any time you load this skin in the future. You can also right-click the skin to change other skin options as desired.
There we have our first meter, and a fully functioning Rainmeter skin. Clicking on the Notepad text will launch the application. Congratulations! Take a short break.
Adding another meter
Next, let's add another meter to launch another application. The format of the meter will be much the same as the earlier one, but we need to do some things to make sure the position of the meter is appropriate.
[MeterLaunch2] |
The important changes here are in the X and Y options for the meter. Remember that X and Y set the position of a meter in the context of the overall skin. Note that we are using relative positioning to set the X option zero pixels relative to the left of the previous meter, (in effect the same X as before) and the Y option two pixels relative to the botton of the previous meter. We could also have specifically set the value of X and Y to some hard-coded value, but using relative positioning is often much easier when laying out a skin's meters.

We have changed the Text and LeftMouseUpAction options for our second application, and we can now use Manage and the Refresh button at the upper right to see our changes in action. Note that you can also right-click the skin on the screen and say Refresh skin.
A new meter type: The Image meter
Now we are going to shift gears a bit, and introduce a new meter type. What we want to do with the next meter is display an image, which we can click on to launch the application.
[MeterLaunch3Image] |
We have created a new section that has the Meter option set to Meter=Image. We are going to use an image file we will include with our skin, so we have a couple of things to do to set that up correctly.
- First, we need to create a folder to hold all the images for our tutorial skins. We will use this folder not only for this Launcher skin, but other ones going forward.
In Windows Explorer, create a new folder under Skins\Tutorials\ called @Resources. The @Resources folder is a special folder under the root config of a skin or suite of skins, used to hold images, sounds, fonts, include files and other shared resources for the skins. - In this Skins\Tutorials\@Resources\ folder, create a new folder called Images. Download and copy the image below into that Skins\Tutorials\@Resources\Images folder.

Now let's go back to our skin code. We have set the ImageName option to use the built-in #@# shortcut for the @Resources folder, and the sub-folder of Images where we put our calc.png image file. The Image meter will load and display this image.
Next, we decided that the 128x128 pixels size of that original image file was just too large for our purposes. So we used the W and H (width and height) options to change the size of the image to 32x32 pixels when displayed. Just like the String meter, Image meters use both General meter options and options specific to the Image meter type.
Just as you did with the second String meter above, use relative positioning and the X and Y options to position the image below the previous meter.
ImageName=#@#Images\Calc.png |
Then, just as with the String meters above, set the LeftMouseUpAction option to LeftMouseUpAction=["Calc.exe"] so that the Windows Calculator is launched when the image is clicked.
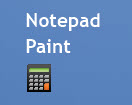
Save your changes and refresh the skin. Click on the image to launch Windows Calculator.
You could just use the image as is, but let's add a string label next to the image. For that, create a new String meter, much like the ones above.
[MeterLaunch3Text] |
Notice that we have used the X and Y options to set the position of the meter lined up just to the right of the previous meter (the Image meter), and six pixels below the top of it. That will align the meter more or less centered to the right of the image of the calculator. We add the same LeftMouseAction that the Image meter has, so you can click on either to launch the application. Just for fun, we also changed the FontColor of the string.

Save your changes and refresh the skin.
Having this skin just sorta float on the desktop is ok, but let's add a background meter to put a nice dark box behind the entire skin.
An important concept in Rainmeter is that fact that how meters that "overlap" in position display from the standpoint of which is in "front" and which is in "back" on the screen is determined by the position of the meter's code in the skin .ini file. Since we want our background meter to be "behind" all the other meters, we need to put the code for it before the other meters we want in front.
So, let's go back up to the top of the skin, just below the [Rainmeter] section, but before the first String meter [MeterLaunch1] and put in our new background Image meter.
[Rainmeter] |
We have set a specific W and H (width and height) so the meter is large enough to hold all the others, and no X and Y options. This is so the meter will be at the far left and top of the overall skin. We then set SolidColor=60,60,60,255, which in the absence of any ImageName on an Image meter will simply draw a square or rectangle based on the size of the W and H options.

Save your changes and refresh the skin.
Good job! You now have a pretty functional launcher skin that you can add items to, (just follow the patterns you used above) change string or image format options and positioning to modify to your tastes, and end up with something that is both functional and shows off your creativity.